Whiteboard+ adds whiteboards to Confluence that your team works on together, live. Boards are Confluence content: Confluence's permissions, comments, search and page tree apply, and nothing leaves Atlassian.
Watch it
The whole product in four minutes, from plan to production:
Or one feature at a time:
- Plan with Jira, Confluence tables and charts0:22
- Brainstorm in private mode, vote, decide0:40
- Design with Mermaid diagrams and API cards0:30
- Connect parts, trace and present flows0:53
- Present section by section0:26
- Comments, Jira work items, Kanban and planning poker0:43
- Walkthroughs, version history and board code0:42
- Connections in depth2:02
- A system design interview on a board3:04
More on the Migratly YouTube channel.
Getting started
Install Whiteboard+ from the Atlassian Marketplace into Confluence. For the Jira features (work item cards, smart sections, the Jira overview, planning poker), install it into Jira on the same site too; everything else works without Jira.
Make a board
- In any space: Apps in the space's sidebar → Whiteboards → New whiteboard (it opens as "Untitled whiteboard"; rename it from its title), or start from a template.
- In a page: type /whiteboard in the editor, then name a new board or pick an existing one. The page shows a picture of the board; click it to open the board full screen.
Boards save themselves as you work. Esc closes a board opened from a page or the Whiteboards list.
A tour of the board points at each tool the first time you open a board. Take it again any time: the ? button (bottom right) → Take the tour.
Delete a board: in Whiteboards, point at the board's card and click the bin, then Move to trash. It leaves the list straight away (Undo brings it back). Boards in the trash are listed under Trash (next to New whiteboard), where Restore brings one back as it was. Anyone who can edit a board can delete it.
Drawing
The tools are along the bottom: select, hand (move around), shapes, arrows, lines, pen, text, pictures, eraser, then sticky notes, sections, tables, mind maps, stamps, stickers, icons and templates.
- Move around: drag with the hand tool or with the space bar held; zoom with the mouse wheel and Ctrl/⌘.
- Edit text: double-click a shape, or select it and press Enter.
- Tables: the table tool, or paste a range from a spreadsheet. Select a table for buttons that add and remove rows and columns.
- Mind maps: the mind map tool makes a central idea. With an idea selected, Tab adds one under it and Enter one beside it; the map lays itself out.
- Icons: servers, databases, clouds, people, devices and more for architecture diagrams.
Sticky notes and sections
- Sticky notes: the sticky note tool or N, in 8 colours. While writing in one, Tab starts the next. Paste a list (from a document or chat) to get a note per line.
- Arrange: select notes, then Arrange to tidy them into a grid or sort them by colour or by author.
- Sections: drag out a section to group things; what's in a section moves with it. Rename it by double-clicking its title. Select a section to change its colour, including No colour (just an outline and its name). To put things that are already on the board in a section, select them and choose Section.
- Stamps and stickers: put a 👍 or ✅ on a note; stamps stay on what they're put on.
- Names: show who added each note (select notes → Name).
Text with headings and lists
Write formatted text right on the board, as in a Confluence page or a Slack message: Insert → Text with headings (or press / and type text). You type in place, with a bar above the text:
- Tt: Normal text and Headings 1 to 6 (⌘⌥0 to ⌘⌥6, or Ctrl+Alt on Windows).
- B bold, and from ▾: italic, underline, strikethrough, code and clear formatting (⌘B, ⌘I, ⌘U, ⌘⇧X, ⌘⇧M).
- Bulleted and numbered lists (⌘⇧8, ⌘⇧7); Tab indents an item, Shift+Tab moves it back.
- Alignment (left, centre, right), a link (⌘K), a quote, a code block and a divider.
- Markdown as you type:
#to###for headings,-or1.for lists,>for a quote,```for a code block. Enter on an empty last line leaves a quote or a code block. - Text pasted from a Confluence page, a document or an AI chat keeps its headings, lists, bold, links and code (a table comes in as a line per row).
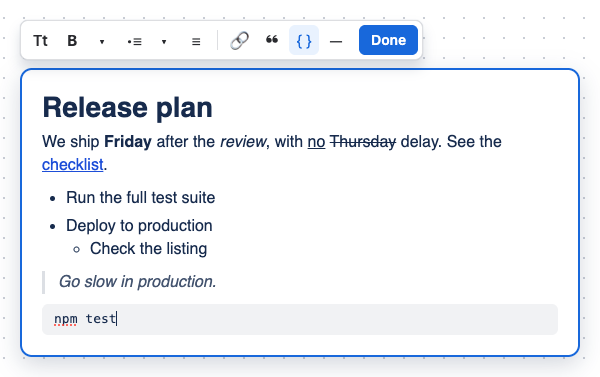
Click anywhere else, press Esc or Done to finish. The text stays on the board as you wrote it, and shows in exports, previews and when presenting. Double-click it (or select it and choose Edit text) to change it; search finds the words in it, and everyone on the board sees the change.
Ask an AI agent for a whole board: Claude, ChatGPT, Cursor and other agents can write board code, a Mermaid-like text that builds sections, notes, diagrams and flows. Paste it onto a board (or Insert → Board from code); the agent skill teaches the agent how.
Templates
The templates button (bottom right) has 35 templates in 8 groups: retrospectives, agile and planning, meetings, strategy, prioritisation, brainstorming, product and UX, and presenting. Search them by name.
Guided walkthrough (in Presenting) has numbered steps. Any section can be a step: select it and type its number in the # box, or number them in Sections. Giving a section a number moves it to that place and the others make room, so the steps stay 1, 2, 3…
To make your own: select part of a board (or nothing, for the whole board), then More (···) → Save as template. Everyone on your site can then start from it.
Working together
- Everyone on a board sees each other's changes and cursors as they happen. Click someone's avatar (top right) to follow their view, or bring everyone to you.
- Comments: Comment (top right) or C, then click anywhere, or select something and click its comment button. Reply, @mention, edit and resolve; the comments list shows Open, Unread and Resolved. They're Confluence comments, with Confluence's notifications.
- Reactions: the 👍 button sends an emoji everyone sees, or confetti. Press /, type what to say and press Enter to say it beside your cursor.
- Restrict editing: the lock beside the board's name (or /restrict) lets only some people edit; others can view. A closed lock means editing is restricted.
- Lock things: select them and choose Lock (or type /lock). Locked things can't be moved or changed; click one to unlock it, or type /unlock over it (anywhere else, it unlocks everything).
Running a session
All in More (···) unless noted.
- Timer (the clock, top right): a countdown everyone sees.
- Voting: choose how many votes each person has (and whether it's anonymous); people vote on sticky notes; end it to see the results. Past results stay in the panel.
- Private mode: what people add stays hidden from others until you end it; anonymous private mode hides who added what, afterwards too.
- Present (top right): the board's sections become slides, and so does each part of the board outside them (a diagram, a group of cards or notes); everyone here follows along. Arrow keys move between slides. If sections are numbered as steps, it goes through just those, from step 1 up. Presenting is full screen; stopping (Esc) goes back to the board as it was. To jump to any step, click its name in the bar at the bottom and search by number or title. Each slide shows what's in its section, as big as the screen allows. Bottom right: zoom out, fit (0) and zoom in (+ / −), and a pen (P) that draws like the whiteboard's pencil; drawings fade away on their own and aren't saved. Esc puts the pen away, then stops presenting (hold Esc to leave full screen at once). When a slide has Confluence pages or Jira work items on it, what they say is shown beside it (I hides it): a page's content, or a work item's status, details and description, as you're allowed to see them. A section holding just one Confluence page is shown as that page, full screen: ↑ and ↓ scroll it, and zooming sizes its text.
- Sections: find a section (or any part of the board) by name and go there; links to each section. Number sections as walkthrough steps here too (Number in order, or type each one's number).
- Planning poker: select Jira cards on the board (or use them all) and start. Everyone picks a card without seeing the others'; reveal them, then save the agreed story points to Jira. The work item's project needs a story points field on its screen.
- Walkthroughs: Record a walkthrough (tick Show me on camera too if you like), then talk while you move round the board and point at things. Pause when you need to; Finish to watch it back, name it and save it for everyone, or discard it. Anyone who can see the board can play it from the same panel: the board moves as it did for you; move it yourself to look around, and Follow to pick up again. Your browser asks for the microphone (and camera) the first time.
Jira
Needs Whiteboard+ installed in Jira on the same site.
- Insert → Jira work item: search (recent work items show first) and add cards that keep their status, type, assignee and story points up to date. Pasting a Jira link works too.
- Create in Jira: select sticky notes, then Create in Jira to make work items from them.
- Smart sections: give a section a Jira status (from the section's toolbar); work items dropped into it move to that status.
- Insert → Jira overview: choose projects to see their sprints, epics, backlog and bugs.
Everyone sees only the Jira information they're allowed to see.
Links and Confluence pages
Insert → Confluence page or link, or paste a link: Confluence pages, people and spaces, and Jira work items become Smart Links, shown as a URL, inline or as a card (select one to change it). Links to other websites show the site and a title from the address.
Diagrams from Mermaid, and Rovo
- Paste Mermaid code anywhere on a board (or Insert → Mermaid diagram) to get a diagram made of ordinary
shapes you can move, edit and comment on: flowcharts, sequence, class, ER and state diagrams. Each comes in
a section of its own, named after the diagram (or its
title), so it's a slide when presenting. Other Mermaid diagrams come in as a picture you can still edit as code. - Anything pasted over a section (Mermaid code, a list, links, a spreadsheet range), or into new text started in one, goes into that section, under what's already there, and the section grows to hold it.
- More (···) → Ask Rovo to summarise, group or add sticky notes. The Whiteboard+ Rovo agent can also create a board with a diagram from a description. Needs Rovo on your site.
Bringing work in and out
- Import (the menu at top left → Import from Miro, Mural or a file…, or drop files on the board):
- Sticky notes from Miro, Mural or Lucidspark: export them as CSV there, then import the file. Check which column holds the text, which one groups notes into sections (an area, frame or tag) and which gives their colour, then add them.
- Pictures of whole boards (PNG or JPG; export PDFs as PNG instead).
- Excalidraw files (.excalidraw), added to what's on the board.
- Export (the same menu): PNG or SVG, an Excalidraw file, a PDF with a page per section, or the sticky notes as a CSV file.
Version history and details
More (···) → Version history shows earlier versions to look at or restore: saves close together are grouped, and Show its saves lists each one. Open a version and choose Restore this version (Undo brings back what was there). Details shows who made the board, where it lives, what's on it and how big it is. Show in page tree adds a page for the board to the space's content.
Keyboard shortcuts
| Key | Does |
|---|---|
| N | Sticky note tool |
| C | Comment tool |
| / | Add something where the pointer is: type /table, /sticky, /section, /mermaid, /jira, /template… and press Enter (or type anything else to say it beside your cursor) |
| Tab, Enter | Next sticky note; in mind maps, an idea under or beside |
| Esc | Close menus, players and dialogs; close the board |
Questions
- I can see a board but not change it. Its editing may be restricted (ask someone who can edit it), you may not have permission to edit in the space, or your site's Whiteboard+ subscription may have ended (the board says so).
- Jira cards don't show. Whiteboard+ needs installing in Jira on the same site, and you need access to the work items.
- Planning poker can't save story points. The work item's project doesn't have a story points field on its screen; ask your Jira admin, or save the estimate yourself.
- Recording doesn't start. Allow the microphone (and camera) for your Atlassian site in your browser's settings, and close other apps using them.
Privacy and support
Whiteboard+ runs on Atlassian: your boards and everything about them stay in your Atlassian site. See the privacy policy.
Support: support@migratly.dev, Monday to Friday 10:00–18:00 IST (we reply within one working day).